
I recently wrote a post about how to name your advertising campaigns in a way that makes managing your ad accounts easier. One of the most important learnings from that post was to be consistent when naming ad campaigns. This means always use the same structure, the same variables and share this information with everyone managing campaigns in ad accounts. This sounds like a fairly easy task, but the truth is it's hard to follow these guidelines if you don't have a structured process in place.
To help you out, we’ve decided to share our campaign name and URL builder. In this post, we're going to show you step-by-step how to get started with it.


How to use campaign name and URL builder
Start by opening our campaign name and URL builder spreadsheet and make a copy of it.
Step 1: Where is your traffic coming from?
Add the sources you use to drive traffic to your website
Utm_source is the referrer of the visits, e.g., Google, Facebook, Bing, Twitter. Adding traffic source to your UTM-tagged destination URL helps Google Analytics understand where the traffic is coming from and thus attribute it to the right traffic source.
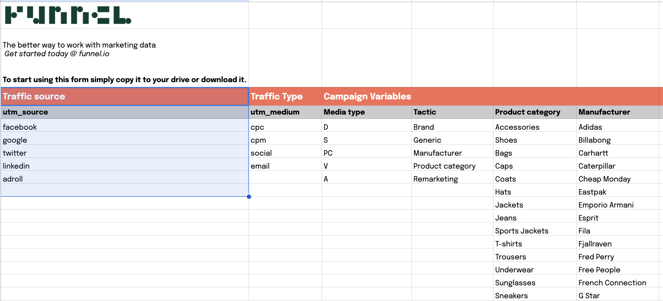
Step 2: What kind of traffic are you driving to your website?
Add the different traffic types you use to drive traffic to your website
Traffic type (utm_medium: e.g., cpc, cpm, social, email) allows you to get insights on how the traffic you drove to your website was bought and whether it was organic or paid.
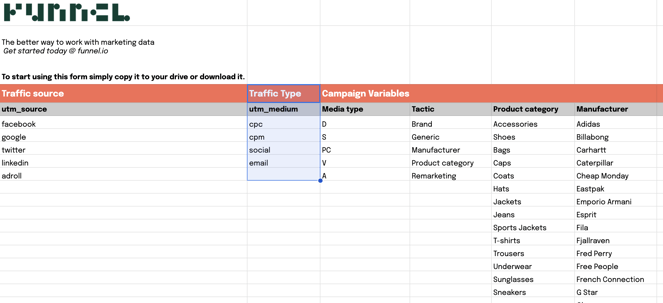
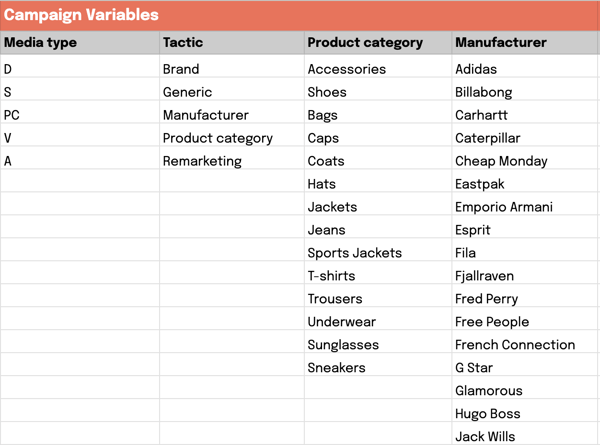
Step 3: How do you want to group your ad campaigns and advertising data?
Add campaign variable categories to get better insights and for easier grouping
Add campaign variable categories to make your campaign names more informative and your ad accounts easier to handle. Also, using thought-through categories allows you to easily group and filter your advertising campaign data and hence makes analyzing the data easier.
Before adding any, discuss and decide with your team which ad campaign variables to use. You can find inspiration for campaign variables in our post about campaign namings.

Step 4: What are you advertising, to who, and how?
Fill categories with values that mirror your business
Give all your categories values that make sense for your business. If you're advertising for multiple product categories or brands give them all a value under the respective category. This way, your ad campaign names will be packed with information that will allow you to create a better account structure that is easily interpreted. Finally, consider creating a coding frame to shorten the variables in your campaign name. This could be useful if you are planning to use multiple variables in your campaign names.
Step 5: Start building
Start by pasting the landing page URL into the “Destination URL” column. Choose utm_source and utm_medium from the drop-down list and give values to the rest of the campaign variables. The campaign name builder will create and update your ad campaign name and UTM-tagged destination URL automatically.

Create your campaign name and UTM-tagged destination URL
Step 6: Add campaign name to ad platform
Copy campaign name and paste it as campaign name in ad platform
Once you've added destination URL, utm_source, utm_medium, and all the campaign variables you'd like to use, just copy the campaign name from the “orange area” and paste it as campaign name in the ad platform you’re using. By copy-pasting the campaign name directly into the ad platform you ensure that your tracking platform can do a good job linking your ad platform data with your website data.

Copy the campaign name

Paste it as the campaign name into the ad platform you're using
Step 7: Add UTM-tagged destination URL
Copy and paste full destination URL as destination URL in ad platform

Copy the UTM-tagged destination URL

Paste it as the destination URL in the ad platform you're using
And you're done. Easy right? As it should be.
I hope you’ll find this useful. As always, if you have any feedback on how to make our builder even better, drop us a line in the comments.
Related reading: How to name your ad campaign like a pro